
PLEASE NOTE: THIS BLOG ARTICLE FEATURES FUNCTIONALITY THAT HAS SINCE BEEN DEPRECATED OR REMOVED FROM PINGDOM AND IS MEANT TO SERVE AS AN ARCHIVAL RECORD ONLY.
 We announced the beta for the Pingdom Transaction Monitor recently, and we’ve been expanding it to include more users. There’s been plenty of helpful feedback, much of what’s already been put into the pipeline for the future. The Transaction Monitor is on a fast development cycle, where the input from beta users is critical, so we appreciate all the help.
In case you have not yet tried the Transaction Monitor (and you can still sign up to be a part of the beta) we wanted to give you an idea of how to use use it. We think it’s a very easy-to-use, versatile and powerful tool, which can help you monitor multi-step transactions spanning several pages, scripts, etc.
What is the Transaction Monitor?
The website monitoring we offer today lets you keep a close eye on your sites and servers to see whether they are up and running or not. You should be the first to know of any problems so you can take action before the visitors to your site are affected.
But many of the website applications you create and rely on involve several steps or scripts working together to form a transaction, which must produce a certain output. This could be, for example, a user registering for a new account, or a customer putting something in the shopping cart and checking out, etc.
Such a transaction may contain multiple steps and scripts, and span several pages on your site. That’s where the Transaction Monitor comes in. It will let you specify what the steps are in the transaction you want to monitor, and what the expected results are.
Example 1: Check the status of Wikipedia
We’ll kick off with a very simple check. You don’t have to type it in now as we’ll go through it step-by-step below.
1. Go to URL http://www.wikipedia.org

2. HTTP status code should be 200
Briefly, this check connects to wikipedia.org on the first line, and the second line tests the HTTP status of that page.
Line 1
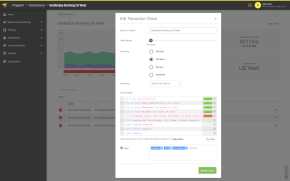
To start with, click in the empty space for line 1 in the Check Editor.

Then double click on the line “Go to URL” in the drop down menu. You can also just press enter. “Go to URL” should now appear in line 1.
Now you type in the URL you want the check to go to. In this example that’s “www.wikipedia.org”. Press enter when you’re done. Now you should notice that the script connects to the web page you have specified, and fetches the complete page in the background. Once it has done that, it will display the load time in a green bubble on line 1.
Line 2
The editor should already have moved to line 2 and display a drop down menu.

As you can see in the drop down menu, you now have a choice between Commands and Validations. Put simply, a command tells the check to do something, like click a button, and a validation tells the check to make sure something exists on the page or that something is in a particular state.
In this example, you want to either double click on “URL should be…” or step down with the arrow keys and press enter. The editor will then fill in that validation.
You can also just type in the command or validation.
The editor fills in the URL automatically. You can change it if you like, but for this example, it is the correct URL.

Finally, click the Create Check button to save it.
It may strike you that, in this case, the check doesn’t do much different than a regular Pingdom monitoring check would, and you’d be right. But in the next example we’ll add some steps, which will hopefully show you how Transaction Monitoring is different.
Example 2: Search Wikipedia
Let’s take this a step further and make the check do something more meaningful. Basically, this example connects to Wikipedia, searches for a term, and checks that the site’s search ends up on the right page. You can try the following script here. You don’t have to type it in now as we’ll go through it step-by-step below.
1. Go to URL wikipedia.org

2. Fill in field #searchInput with Sweden

3. Click go

4. URL should be http://en.wikipedia.org/wiki/Sweden
Line 1
As you can see, the first line is still “Go to URL…” and it connects to Wikipedia.org, like in the first example.
Line 2
For line 2, we double click on the “Fill in field…” line under “Commands” in the drop down menu to make that the second line in the Check Editor.

You should notice that the editor only shows you the relevant options from the actual web page you stated in line 1. In other words, the options for the “Fill in field…” command that can be applied in the particular case. This is because, as we mentioned in the first example, the editor will fetch webpages in the background.
In this case, the editor shows a drop down menu asking first for the element (basically the search box into which you want to enter something). You should select the “<input id=”searchInput”…” line.
The last step for the second line of this example is to enter the text you want to put in the search box so the check can search for it. There’s nothing to select in the drop down so you just type in what you want it to search for, in our example we type in “Sweden” (without the quotation marks).

Line 3
The next step is to tell the check to click the button on the site so it actually does the search.
On line 3, select “Click…” in the drop down menu. Once you have done that, the script will in the background fetch all the elements on the page that you can actually click on. These are displayed in a drop down menu.
You want to find the line “<input name=”go” type=”submit” value=” → “>” and select it (it’s near to the top of the list).

Line 4
For the last line, we want the check to make sure that after the search has been executed, the site has landed on the correct URL.
Select “URL should be URL” so it lands on line 4. The editor will automatically suggest “http://en.wikipedia.org/wiki/Sweden”, which is also where we want it to be.

You can now go ahead and save the check.
Let’s see what you come up with
That’s just two simple examples of how to use the Pingdom Transaction Monitor. We hope you join the beta program and start creating your own checks. Once you have, let us know because we’d love to see what you come up with.
We’ll return really soon with another article about the Transaction Monitor and what you can use it fort. In the meantime, sign up for a beta account and start monitoring your website transactions.